|
Channels/Network Interfaces |
|
|
Image |
Description |
|---|---|
|
|
This page gives you an overview of the channel configuration of the currently connected Vector device as well as related hardware information. The window is divided into the following parts:
|
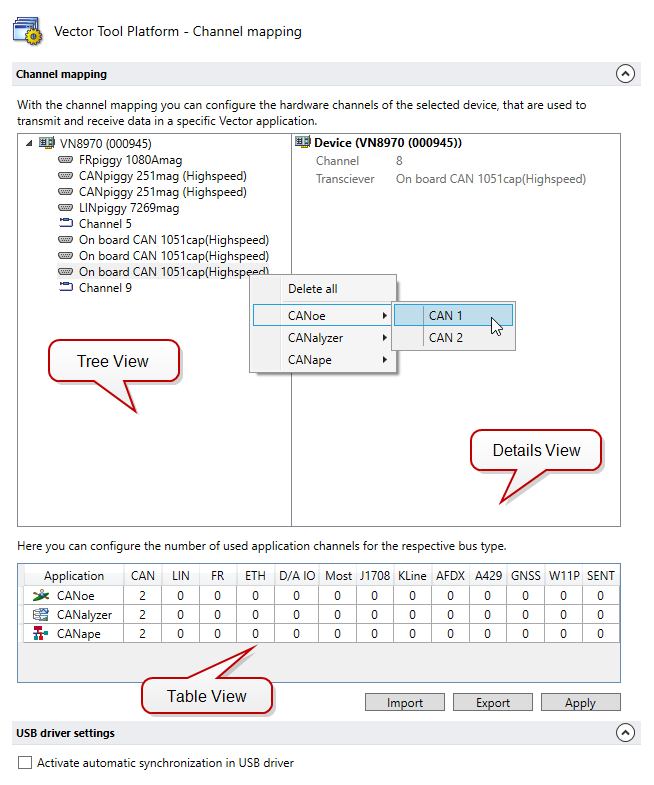
Channel Mapping
With the Channel Mapping you can configure the hardware channels that are used to transmit and receive data in a specific Vector application (e.g. CANoe, CANalyzer, CANape, ...). Before a message can be transmitted or received, you have to specify the hardware channels that have to be used by the Vector application.
With the Vector Platform Manager you configure the channels on the connected device. Using the Vector Hardware Configuration in the Control Panel you configure the channels on your local computer.
Procedures in the Tree View and Details View
- Select a listed device to see its general information.
- Add an application channel to a hardware channel by right-clicking the hardware channel and selecting an application channel in the context menu.
- Delete an application channel by right-clicking the application channel followed by Delete in the context menu.
- Delete all application channels by right-clicking a hardware channel followed by Delete All in the context menu.
Procedures in the Table View / Application
Each application can have a set of different bus systems. The according channel configuration is read by the application at runtime. In general, those items are created by Vector applications, but it is also possible to create customer specific applications.
- Change the maximum number of possible application channels for each application as required by editing the associated cells.
- Add new applications with the context menu: Add Application
- Delete the selected application with the context menu: Delete Application
Procedures to Persist, Import and Export the Channel Configuration
- [Apply] persists the changes of the channel configuration on the device.
- [Export] exports the current channel configuration of the device as a *.vtpcc file.
- [Import] imports the channel configuration of a previously exported *.vtpcc file to the device.
Procedures to open the device configuration dialogs
The Ethernet Device Configuration dialog and the Time Sync Device Configuration dialog are available for Ethernet network interfaces and can be opened by right-clicking the corresponding hardware node or using the buttons in the details view of a selected hardware node. The Ethernet Device Configuration dialog provides settings to configure the Automotive Ethernet network settings of the device. In the Time Sync Device Configuration dialog you can configure the time synchronization settings of the device.
USB Driver Settings
VTP devices can be configured as such, that when a USB device is connected, an automated synchronization of the channel mapping configuration takes place. Changes in the local settings of the user computer will then be transferred to the device automatically. The automated synchronization is activated by default and can be disabled if needed, e.g. to block overwriting the channel configuration of the device that was set by the Platform Manager under Tool Platform.