# How to Deploy the Arm-2D Library {#deploy}
This document describes how to deploy the **Arm-2D** library to your existing MDK projects. If you are not familiar with **Arm-2D**, please start from the **[README](../README.md)** first.
### Table of Contents
- [1 How to get the Arm-2D](#1-how-to-get-the-arm-2d)
- [2 How to Deploy Arm-2D](#2-how-to-deploy-arm-2d)
- [2.1 Deploy Using CMSIS-Pack in MDK](#21-deploy-using-cmsis-pack-in-mdk)
- [3 Helper Services and Extras](#3-helper-services-and-extras)
- [3.1 Preparation](#31-preparation)
- [3.2 Add Display Adapter Service](#32-add-display-adapter-service)
- [3.3 Configue the Display Adapter Service](#33-configue-the-display-adapter-service)
- [3.4 Implement the External Reference Timer](#34-implement-the-external-reference-timer)
- [3.5 Verifying The Porting Result](#35-verifying-the-porting-result)
- [4 Example Projects](#4-example-projects)
## 1 How to get the Arm-2D
There are three methods to get Arm-2D:
- Cloning Arm-2D repository on Github using the following command line:
```shell
git clone https://github.com/ARM-software/Arm-2D.git
```
- Downloading Arm-2D CMSIS-Pack from the [release page](https://github.com/ARM-software/Arm-2D/releases).
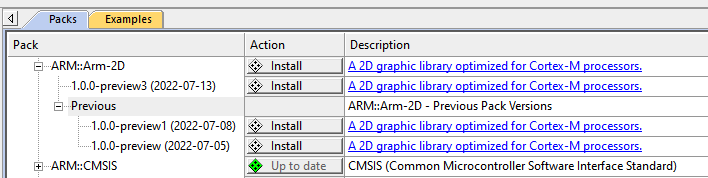
- Checking for Updates in pack-installer and installing the latest Arm-2D packs as shown in **Figure 1-1** and **Figure 1-2**
**Figure 1-1 Check for Updates in Pack Installer**
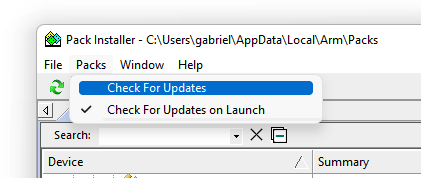
**Figure 1-2 Install Arm-2D in Pack Installer**
## 2 How to Deploy Arm-2D
### 2.1 Deploy Using CMSIS-Pack in MDK
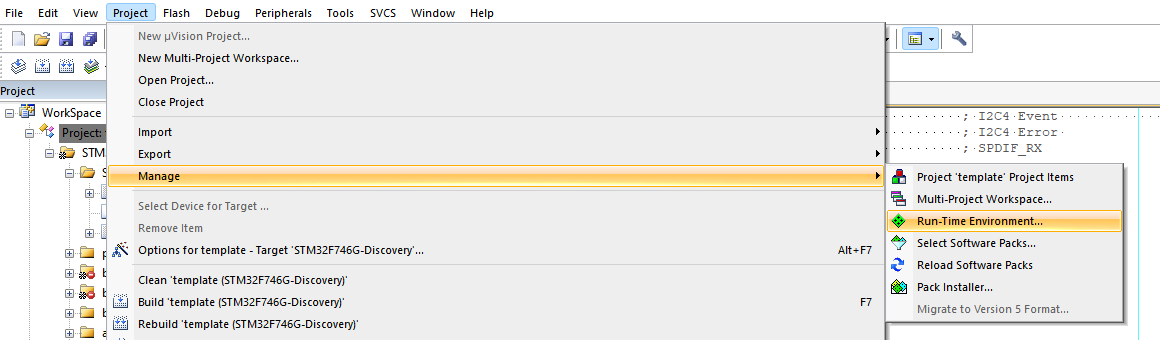
1. Open the Run-Time Environment configuration dialog using menu "Project->Manage->Run-Time Environment" as shown in **Figure 2-6**.
**Figure 2-6 Open Run-Time Environment Dialog**
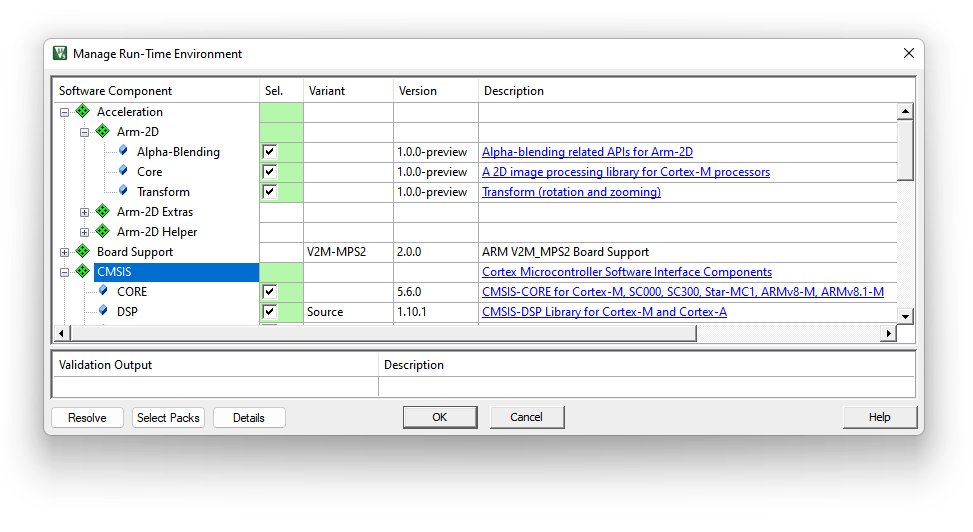
2. Expand **Acceleration** and select **Core**, **Alpha-Blending** and **Transform** under **Arm-2D** as shown below. Make sure you also select **CMSIS-CORE** and **CMSIS-DSP**.
**Figure 2-7 Select Arm-2D in RTE**
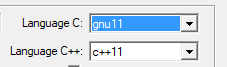
3. Enable **C11** and **GNU extension** support in C/C++(AC6) configurations:
**Figure 2-3 Enable "gnu11" in Arm Compiler 6**
4. Include the header file `arm_2d.h` in your source code where you want to use the library:
```c
#include "arm_2d.h"
```
5. Initialize Arm-2D by calling function `arm_2d_init()` :
```c
static void system_init(void)
{
...
arm_2d_init();
...
}
```
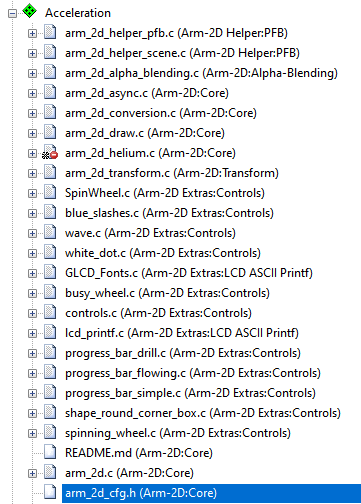
6. Expand Acceleration in the project view and open `arm_2d_cfg.h` as shown in **Figure 2-8**.
**Figure 2-8 Find arm_2d_cfg.h in the project view**
Open the **Configuration Wizard** and check options available for Arm-2D
**Figure 2-9 Configuration Wizard for Arm-2D**
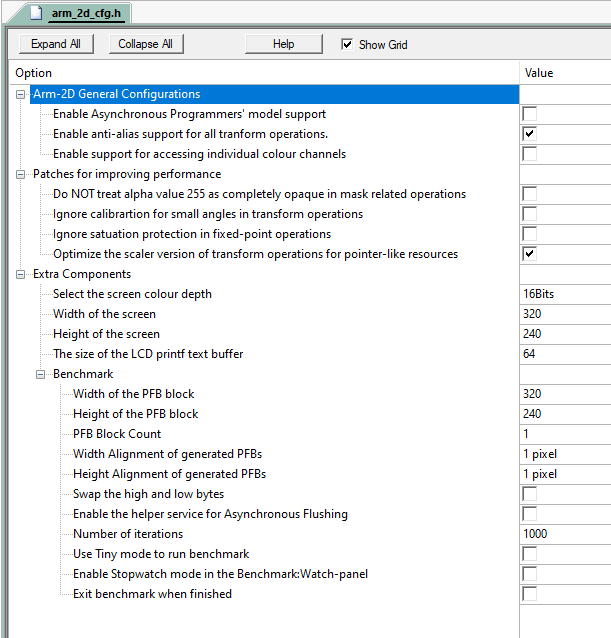
**NOTE**: If you want to support **CCCA8888** (i.e. **RGBA8888**), please selet the `Enable support for accessing individual colour channels`.
## 3 Helper Services and Extras
Suppose you want to develop GUI applications directly with Arm-2D. In that case, it implies that you not only use Arm-2D APIs for the framebuffer-based low-level 2D image processing but also want to display the processed result on a screen. An ordinary GUI software stack will provide a dedicated service for connecting a target screen, and users must implement a driver or adapter between the hardware and the service. Such a service usually allows people to refresh the whole screen with a petite frame buffer called partial frame buffer (PFB). This feature is vital for resource-constraint embedded platforms. Arm-2D provide a similar feature through a helper service called Display Adapter Service.
### 3.1 Preparation
Before we start, we have to prepare a low-level flushing function called Disp0_DrawBitmap(). Its prototype is shown below:
```c
int32_t Disp0_DrawBitmap(int16_t x,
int16_t y,
int16_t width,
int16_t height,
const uint8_t *bitmap);
```
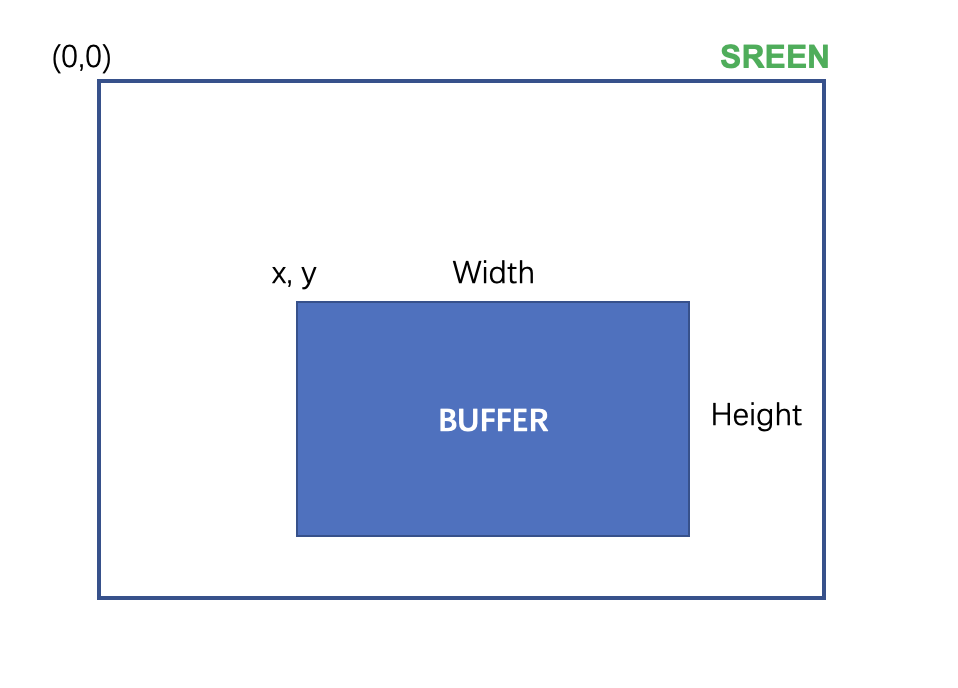
Here as shown in **Figure 3-1**:
- `x`,`y` are the absolute coordinates in the target screen
- `width` and` height` describe the size of the rectangular target area
- `bitmap` points to a framebuffer which holds all pixels in a rectangular area with the given `width` and `height`.
**Figure 3-1 The Scheme of the Low Level Flushing Interface**
 Suppose the display RAM of your LCD has been mapped into internal 4G memory space. An example of `Disp0_DrawBitmap()` might look like this:
```c
/**
\fn int32_t Disp0_DrawBitmap (uint32_t x, uint32_t y, uint32_t width, uint32_t height, const uint8_t *bitmap)
\brief Draw bitmap (bitmap from BMP file without header)
\param[in] x Start x position in pixels (0 = left corner)
\param[in] y Start y position in pixels (0 = upper corner)
\param[in] width Bitmap width in pixels
\param[in] height Bitmap height in pixels
\param[in] bitmap Bitmap data
\returns
- \b 0: function succeeded
- \b -1: function failed
*/
int32_t Disp0_DrawBitmap (uint32_t x, uint32_t y, uint32_t width, uint32_t height, const uint8_t *bitmap)
{
volatile uint16_t *phwDes = disp_ram + y * GLCD_WIDTH + x;
const uint16_t *phwSrc = (const uint16_t *)bitmap;
for (int_fast16_t i = 0; i < height; i++) {
memcpy ((uint16_t *)phwDes, phwSrc, width * 2);
phwSrc += width;
phwDes += GLCD_WIDTH;
}
return 0;
}
```
Here, `disp_ram` points to the memory space reserved for the LCD display RAM.
**IMPORTANT**:
1. When exiting the `Disp0_DrawBitmap()`, Arm-2D assumes that the target frame buffer has already been flushed to the target screen.
2. **Please verify the `Disp0_DrawBitmap()` functional correctness without Arm-2d before moving to the next steps.**
### 3.2 Add Display Adapter Service
Deploying Display Adatper service in MDK is simple:
1. Open RTE dialog (as shown in **Figure 3-2**)
2. Expand `Acceleration::Arm-2D Helper`
3. Select the **PFB** and increase the number of **Display Adapter** to `1`.
**NOTE**: If you have multiple screens, please set the number accordingly.
4. If you see any warning message in yellow, please click the Resolve button. The warning should disappear.
5. Click **OK** button to close the RTE dialog.
**Figure 3-2 Selecting Display Adapter Service in RTE**
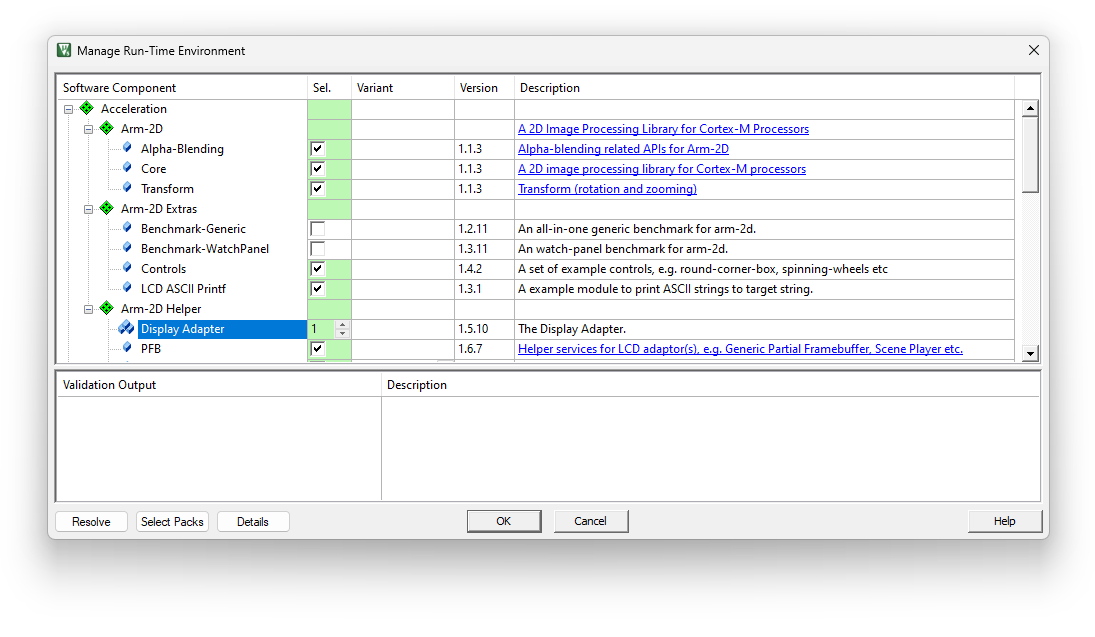
After that, you will see two files, i.e. `arm_2d_disp_adapter_0.c` and `arm_2d_disp_adapter_0.h` have been added to the project manager under the **Acceleration** group.
**IMPORTANT**: unless necessary, please do **NOT** modify the content of the `arm_2d_disp_adapter_0.c`, as new versions of Arm-2D often introduce new features to the Display Adatper Service, as long as you haven't modified anything in the `arm_2d_disp_adapter_0.c`, updating to the latest version would be an easy task nothing more than right-clicking the file in the project manager and updating to the latest version in the pop-up menu.
**You have to initalise the Display Adapter service before using it**.
Include `arm_2d_disp_adapters.h` in your c source code and add the following code to the `main()` function:
```c
#include "arm_2d_helper.h"
#include "arm_2d_disp_adapters.h"
#include "arm_2d_scenes.h"
int main (void)
{
...
arm_irq_safe {
arm_2d_init();
}
/* initialize the display adapter 0 service */
disp_adapter0_init();
while (1) {
/* the task function of the display adapter 0 service */
disp_adapter0_task();
}
}
```
Or the thread function if you want to run Arm-2d in an RTOS environment:
```c
#include "arm_2d_helper.h"
#include "arm_2d_disp_adapters.h"
#include "arm_2d_scenes.h"
#ifndef LCD_TARGET_FPS
# define LCD_TARGET_FPS 30
#endif
__NO_RETURN
void app_2d_main_thread (void *argument)
{
arm_irq_safe {
arm_2d_init();
}
/* initialize the display adapter 0 service */
disp_adapter0_init();
while(1) {
//! retrieve the number of system ticks
uint32_t wTick = osKernelGetTickCount();
while(arm_fsm_rt_cpl != disp_adapter0_task());
//! lock frame rate
osDelayUntil(wTick + (1000 / LCD_TARGET_FPS));
}
//osThreadExit();
}
```
### 3.3 Configue the Display Adapter Service
You should configure the Display Adapter service before using it. All the configurations of a Display Adapter service are stored in the corresponding header file, e.g. `arm_2d_disp_adapter_0.h`. In MDK, all configuration work can be done through the GUI wizard, as shown in **Figure 3-3**.
**Figure 3-3 Configure the Display Adapter Using the Wizard**
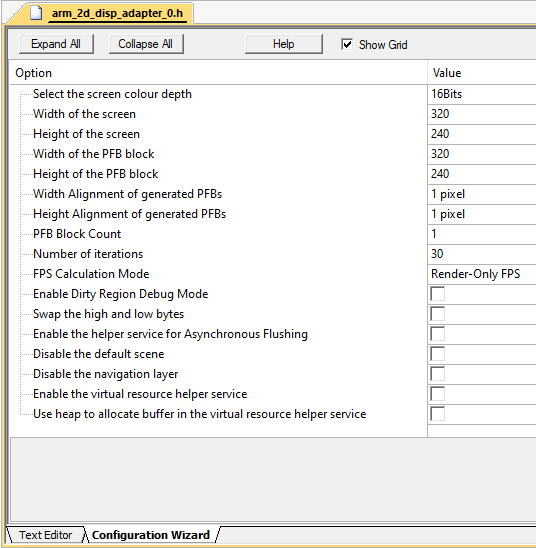
There are many options available in the list, and we only explain those important and commonly used ones here:
**Table 3-1 The Important and Commonly Used Options of the Display Adapter Service**
| Options | Value | Default | Description |
| --------------------------------------------------- | ------------------------ | --------------- | ------------------------------------------------------------ |
| Select the screen colour depth | 8bits/16bits/32bits | 16bits | The number of bits per pixel. For monochrome LCD and e-ink LCD, please select the 8bits. |
| Width of the screen | 8...32767 | 320 | The width of the target screen |
| Height of the screen | 8...32767 | 240 | The height of the target screen |
| Width of the PFB block | 1...32767 | 320 | The width of a partial frame buffer (PFB). If possible, please use the screen width here. |
| Height of the PFB block | 1...32767 | 240 | The height of a partial frame buffer (PFB). It is recommended to start from 1/10 of the height of the screen. If possible, do not use a value smaller than 8. |
| Width Alignment of generated PFBs | 1/2/4...128 pixels | 1 pixel | The horizontal pixel alignment of the PFBs sending to the `DispN_DrawBitmap()` for flushing. It is important for LCDs that have certain pixel alignment requirements. For example, 8 pixel alignment for monochrome LCDs and 4 pixel alignment for e-inks. |
| Height Alignment of generated PFBs | 1/2/4...128 pixels | 1 pixel | The vertical pixel alignment of the PFBs sending to the `DispN_DrawBitmap()` for flushing. It is important for LCDs that have certain pixel alignment requirements. For example, 8 pixel alignment for some 12864 monochrome LCDs. |
| PFB Block Count | 1...32767 | 1 | The number of PFB blocks in the pool. Please set it to `2` or more when using Asynchornose flushing mode; otherwise, keep it as `1`. |
| Number of iterations | 0...32767 | 30 | Calculate the real-time FPS for every specified number of frames. Set it to `0` to disable the real-time FPS calculation. |
| FPS Calculation Mode | Render-Only FPS/Real FPS | Render-Only FPS | **Render-Only FPS**: record the time used by the renderer and use it to calculate the FPS without taking LCD latency into consideration.
Suppose the display RAM of your LCD has been mapped into internal 4G memory space. An example of `Disp0_DrawBitmap()` might look like this:
```c
/**
\fn int32_t Disp0_DrawBitmap (uint32_t x, uint32_t y, uint32_t width, uint32_t height, const uint8_t *bitmap)
\brief Draw bitmap (bitmap from BMP file without header)
\param[in] x Start x position in pixels (0 = left corner)
\param[in] y Start y position in pixels (0 = upper corner)
\param[in] width Bitmap width in pixels
\param[in] height Bitmap height in pixels
\param[in] bitmap Bitmap data
\returns
- \b 0: function succeeded
- \b -1: function failed
*/
int32_t Disp0_DrawBitmap (uint32_t x, uint32_t y, uint32_t width, uint32_t height, const uint8_t *bitmap)
{
volatile uint16_t *phwDes = disp_ram + y * GLCD_WIDTH + x;
const uint16_t *phwSrc = (const uint16_t *)bitmap;
for (int_fast16_t i = 0; i < height; i++) {
memcpy ((uint16_t *)phwDes, phwSrc, width * 2);
phwSrc += width;
phwDes += GLCD_WIDTH;
}
return 0;
}
```
Here, `disp_ram` points to the memory space reserved for the LCD display RAM.
**IMPORTANT**:
1. When exiting the `Disp0_DrawBitmap()`, Arm-2D assumes that the target frame buffer has already been flushed to the target screen.
2. **Please verify the `Disp0_DrawBitmap()` functional correctness without Arm-2d before moving to the next steps.**
### 3.2 Add Display Adapter Service
Deploying Display Adatper service in MDK is simple:
1. Open RTE dialog (as shown in **Figure 3-2**)
2. Expand `Acceleration::Arm-2D Helper`
3. Select the **PFB** and increase the number of **Display Adapter** to `1`.
**NOTE**: If you have multiple screens, please set the number accordingly.
4. If you see any warning message in yellow, please click the Resolve button. The warning should disappear.
5. Click **OK** button to close the RTE dialog.
**Figure 3-2 Selecting Display Adapter Service in RTE**

After that, you will see two files, i.e. `arm_2d_disp_adapter_0.c` and `arm_2d_disp_adapter_0.h` have been added to the project manager under the **Acceleration** group.
**IMPORTANT**: unless necessary, please do **NOT** modify the content of the `arm_2d_disp_adapter_0.c`, as new versions of Arm-2D often introduce new features to the Display Adatper Service, as long as you haven't modified anything in the `arm_2d_disp_adapter_0.c`, updating to the latest version would be an easy task nothing more than right-clicking the file in the project manager and updating to the latest version in the pop-up menu.
**You have to initalise the Display Adapter service before using it**.
Include `arm_2d_disp_adapters.h` in your c source code and add the following code to the `main()` function:
```c
#include "arm_2d_helper.h"
#include "arm_2d_disp_adapters.h"
#include "arm_2d_scenes.h"
int main (void)
{
...
arm_irq_safe {
arm_2d_init();
}
/* initialize the display adapter 0 service */
disp_adapter0_init();
while (1) {
/* the task function of the display adapter 0 service */
disp_adapter0_task();
}
}
```
Or the thread function if you want to run Arm-2d in an RTOS environment:
```c
#include "arm_2d_helper.h"
#include "arm_2d_disp_adapters.h"
#include "arm_2d_scenes.h"
#ifndef LCD_TARGET_FPS
# define LCD_TARGET_FPS 30
#endif
__NO_RETURN
void app_2d_main_thread (void *argument)
{
arm_irq_safe {
arm_2d_init();
}
/* initialize the display adapter 0 service */
disp_adapter0_init();
while(1) {
//! retrieve the number of system ticks
uint32_t wTick = osKernelGetTickCount();
while(arm_fsm_rt_cpl != disp_adapter0_task());
//! lock frame rate
osDelayUntil(wTick + (1000 / LCD_TARGET_FPS));
}
//osThreadExit();
}
```
### 3.3 Configue the Display Adapter Service
You should configure the Display Adapter service before using it. All the configurations of a Display Adapter service are stored in the corresponding header file, e.g. `arm_2d_disp_adapter_0.h`. In MDK, all configuration work can be done through the GUI wizard, as shown in **Figure 3-3**.
**Figure 3-3 Configure the Display Adapter Using the Wizard**

There are many options available in the list, and we only explain those important and commonly used ones here:
**Table 3-1 The Important and Commonly Used Options of the Display Adapter Service**
| Options | Value | Default | Description |
| --------------------------------------------------- | ------------------------ | --------------- | ------------------------------------------------------------ |
| Select the screen colour depth | 8bits/16bits/32bits | 16bits | The number of bits per pixel. For monochrome LCD and e-ink LCD, please select the 8bits. |
| Width of the screen | 8...32767 | 320 | The width of the target screen |
| Height of the screen | 8...32767 | 240 | The height of the target screen |
| Width of the PFB block | 1...32767 | 320 | The width of a partial frame buffer (PFB). If possible, please use the screen width here. |
| Height of the PFB block | 1...32767 | 240 | The height of a partial frame buffer (PFB). It is recommended to start from 1/10 of the height of the screen. If possible, do not use a value smaller than 8. |
| Width Alignment of generated PFBs | 1/2/4...128 pixels | 1 pixel | The horizontal pixel alignment of the PFBs sending to the `DispN_DrawBitmap()` for flushing. It is important for LCDs that have certain pixel alignment requirements. For example, 8 pixel alignment for monochrome LCDs and 4 pixel alignment for e-inks. |
| Height Alignment of generated PFBs | 1/2/4...128 pixels | 1 pixel | The vertical pixel alignment of the PFBs sending to the `DispN_DrawBitmap()` for flushing. It is important for LCDs that have certain pixel alignment requirements. For example, 8 pixel alignment for some 12864 monochrome LCDs. |
| PFB Block Count | 1...32767 | 1 | The number of PFB blocks in the pool. Please set it to `2` or more when using Asynchornose flushing mode; otherwise, keep it as `1`. |
| Number of iterations | 0...32767 | 30 | Calculate the real-time FPS for every specified number of frames. Set it to `0` to disable the real-time FPS calculation. |
| FPS Calculation Mode | Render-Only FPS/Real FPS | Render-Only FPS | **Render-Only FPS**: record the time used by the renderer and use it to calculate the FPS without taking LCD latency into consideration.
**Real FPS**: calculate the real FPS people actually see on the screen. |
| Swap the high and low bytes | Select/Unselect | Unselect | Some RGB565 LCDs require swapping the high and the low bytes for each pixel. Please **ONLY** enable this option when there is no hardware solution to swap the high and low bytes. |
| Enable the helper service for Asynchronous Flushing | Select/Unselect | Unselect | By selecting this option, a dedicated helper service will be provided for asynchronous flushing mode. For more, please read the guidance in the header file. |
| Disable the default Scene | Select/Unselect | Unselect | A Display Adapter brings a default scene for indicating successful porting. You can disable it by selecting this option. |
| Disable the navigation layer | Select/Unselect | Unselect | A Display Adapter uses the navigation layer (which is floating above the content created by users) to show real-time FPS and version info. You should disable it before the product releasing or disable it to add your own navigation layer. |
**NOTE**:
- If the target device cannot afford the full frame buffer, please set the PFB size (i.e. width and/or height) to a smaller value. **We recommend you start with a 1/10 full frame buffer**, as it actually isn't 10x slower than using a full frame buffer.
- For **monochrome LCDs**, you should use 8-bit colour depth and pack every 8 pixels into one byte in the `Disp0_DrawBitmap()`. Don't forget to set the PFB alignment to 8 horizontally or vertically depending on the monochrome LCD pixel layout.
- For **2-bit e-ink LCDs**, you should use 8-bit colour depth and pack every 4 pixels into one byte in the `Disp0_DrawBitmap()`. Don't forget to set the PFB alignment to 4 horizontally or vertically depending on the e-ink LCD pixel layout.
- For **4-bit e-ink LCDs**, you should use 8-bit colour depth and pack every 2 pixels into one byte in the `Disp0_DrawBitmap()`. Don't forget to set the PFB alignment to 2 horizontally or vertically depending on the e-ink LCD pixel layout.
- Please make sure the stack size is no less than 3K Bytes.
### 3.4 Implement the External Reference Timer
Arm-2D helper service relies on an external reference timer which we should implement:
**Table 3-2 The Interface for Accessing the External Timer**
| Interface Prototype | Description |
| ---------------------------------------------------------- | ------------------------------------------------------------ |
| int64_t arm_2d_helper_get_system_timestamp(void) | a function that returns the number of ticks (timestamp) of the reference timer since reset. |
| uint32_t arm_2d_helper_get_reference_clock_frequency(void) | the frequency of the reference timer. |
**We highly recommand you to install perf_counter from Pack-Installer, [Keil Website](https://www.keil.arm.com/packs/) or [its Github repo](https://github.com/GorgonMeducer/perf_counter/releases) to simplify this process.** You have to initialize the perf_counter before using Arm-2D. For more, please read the [guidance here](https://github.com/GorgonMeducer/perf_counter/blob/main/README.md).
### 3.5 Verifying The Porting Result
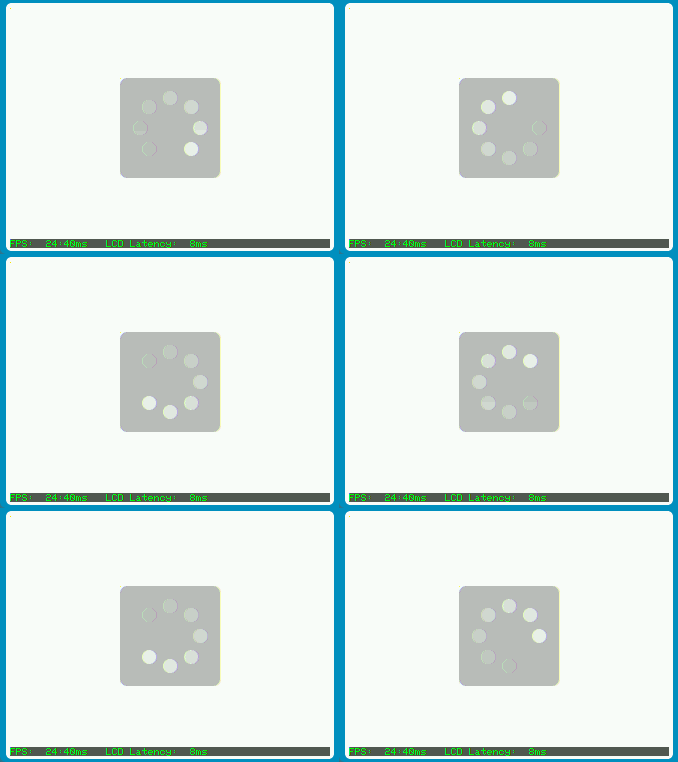
After finished steps above, if everything goes well, you should see a screen as shown in **Figure 3-4**. If the colour doesn't look right and the LCD uses RGB565, try to swap the high and low bytes for each pixel.
**Figure 3-4 The Look of The Default Scene In A Successful Porting**
If you encounter any problems, please feel free to raise an issue.
Enjoy.
## 4 Example Projects
**Table 3-1 Summary**
| Projects | Description | Folder | Note |
| ----------------------------- | ------------------------------------------------------------ | -------------------------------------- | ---- |
| \[template\]\[bare-metal\] | It is a project template for the bare-metal environment. | examples/\[template\]\[bare-metal\] | |
| \[template\]\[cmsis-rtos2\] | It is a project template for the RTOS environment, which use CMSIS-RTOS2 as an example to show how Arm-2D can work with an RTOS. | examples/\[template\]\[cmsis-rtos2\] | |
| \[template\]\[x86\]\[vscode\] | It is a project template for x86 environment using VS Code + SDL2 | examples/\[template\]\[x86\]\[vscode\] | |